Photographing and Processing Infrared Images
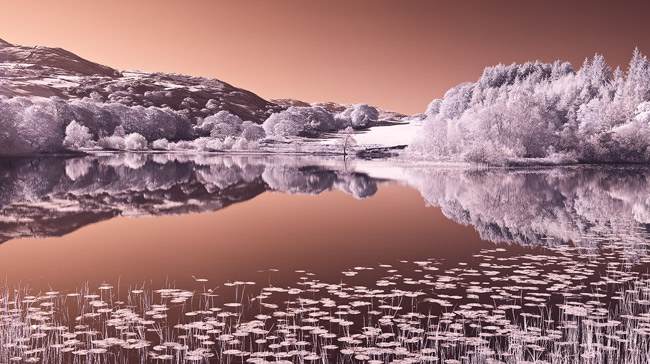
EOS 5DIR, Contax 35-70 f3.4, f8, 1/4sec ISO100, a stitch of four vertical images
Infrared Camera Settings
What are the right settings to use for image capture? Well auto settings are no help here. Shoot RAW, shoot in Manual Mode and shoot manual focus lenses. Many if not most AF lenses create a light 'hotspot' in the centre of the image, created by the infrared light emmitted by the camera. It can be post processed out, but it takes time, so I use the remarkable adapted Contax 35-70 when shooting IR.
When approaching the computer, biggest problems occur with white balance. Auto white balance will cause all manner of issues and inconsistencies, making intense poppy red looking files that are nothing like the one subtle result above. To avoid this problem, set the white balance to a CUSTOM SETTING, using the K white balance setting and push this as far back as possible. On my 5D, I used a minimum value of 2800k to reduce the intense reds. This will make the images look purple (I know, I know), but its the most pleasing place to start and further adjustments will naturally be made in RAW.
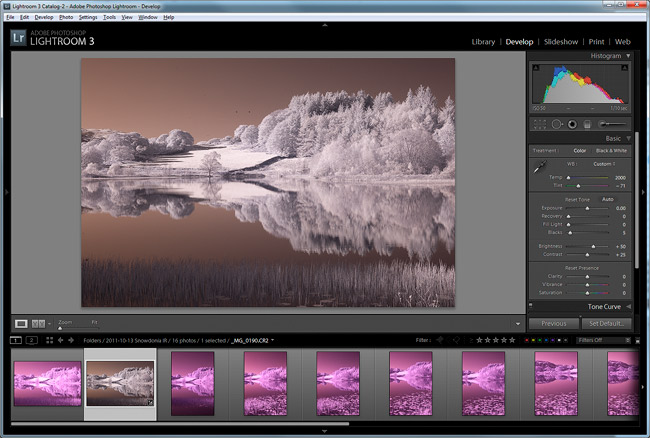
Adjustments in Lightroom
This is how the images look directly out of the camera. There is a very intense magenta cast, but the intense reds are gone, making the image taking experience seem positive rather than a world of utter confusion...

A strong magenta colour cast, how the images look out of the camera....
The next thing to do is to balance the shot so the grasses and foliage look white. Rather than endless manual play with the TEMP and TINT sliders, the easiest thing to do is use the eye dropper, yes you know, the one thats totally useless when working with any other type of image.
Grab the eye dropper tool and click on the foliage or grass and bingo, everything starts to look balanced...
Try making a few clicks with the eye dropper in various spots on the image and see if the balance is more to your liking. Further adjustments to the TINT and TEMP sliders can help further. Place the dropper on the grass or the foliage and these will turn white. Now we are getting somewhere.
Once balanced begin to work the image is worked in the usual way, improving contrast by making adjustments to exposure, blacks, clarity and curves. Now convert to a TIF and open in Photoshop.
False Colour Infrared
To create that weird but compelling blue sky effect that may infrared images have, simply use the Channel Mixer to 'swap' the values in the Red and Blue channels.
Examine the Red Channel. It contains three sliders with Red = 100% Green = 0% and Blue = 0%. You guessed it, the other channels only have 100% values on their own colours.
The secret is to swap the reds and blues around, so in other words the RED channels values are Red 0% Green 0% and Blue 100%
Now reverse this for the Blue channel - Red 100% Green 0% and Blue 0%. Here are some snapshots showing the channel mixer settings for each seperate channel.
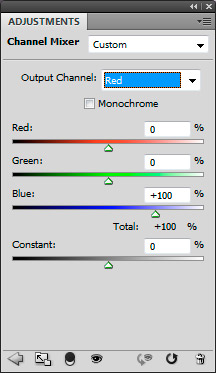
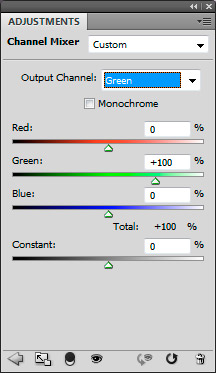
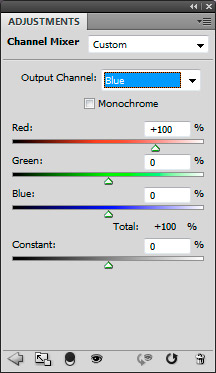
Why not make yourself an Action and record the channel swapping effect, so it can be performed in just one click....
When Does it Work?
So here is the end result, blue sky and blue water. It looks rather wonderful and very releaving to see some sense of normality about an IR image. This is why channel swapping is so popular, but when does it work effectively and why does it often have little effect?
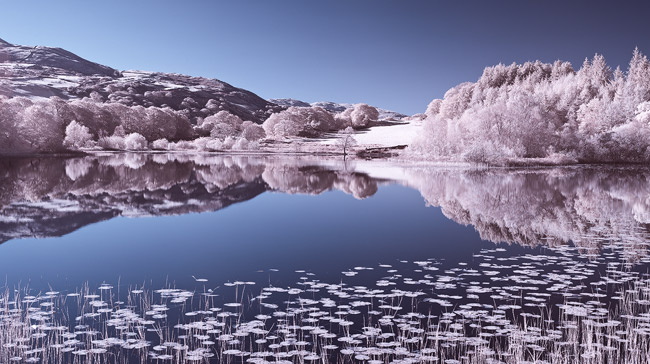
EOS 5DIR, Contax 35-70 f3.4, f8, 1/4sec ISO100, a stitch of four vertical images with False Colour
Remember, the infrared camera is capturing subtle blues as reds, so an image that doesn't contain blue sky, water reflections etc will not respond well with this channel swapping. In fact, it will probably have little or no effect, so make sure the sky is clear or there are clear gaps for the swap to work. Even though your eyes can sees blue, high cloud will ruin the chances of a good conversion significantly. The deeper the blues at the point of capture, the better the swap will be.
A few words about Infrared in Black and White
Black and white is probably the most acceptable medium for infrared (and by far the easiest to start with) as it is a readily accepted representation. The eye finds the tonal differences rather compelling and more acceptable than the colour concept, which is often a little 'psychedelic' for many.
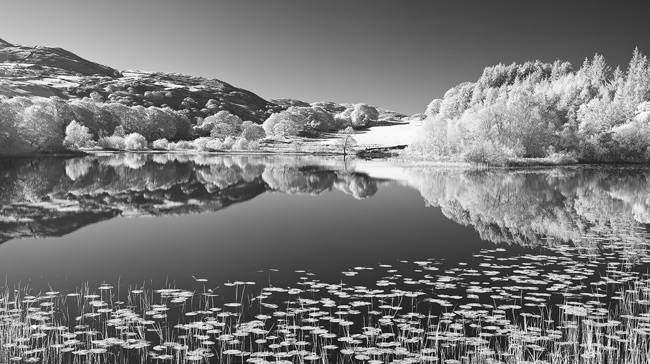
EOS 5DIR, Contax 35-70 f3.4, f8, 1/4sec ISO100, a stitch of four vertical images converted to B&W
Here's the same IR shot modified once again using the Black and White Filter. The red channel is naturally the most sensitive, but yellow and magenta also add masses of tonal control. Make sure the to explore the image at 100% as the B&W FIlter can be very aggressive, introducing noise in the shadows and skies.
Camera Conversion
If you are interested in getting a camera converted, then look no further than Advanced Camera Services. The service was quick and straightforwards. I gladly donated my 5D to the cause and I now find myself reaching for this remarkable camera over colour, especially when shooting in the UK. As with everything in photography it's not cheap, but the end results are so enjoyable that it will change the way you see photography forever. I am a complete IR addict to say the least.
http://www.advancedcameraservices.co.uk/ and here's the PRICE LIST
And Finally....
Where was the image taken? Its a lake called Tecwyn Isaf in Snowdonia. Wonderful isn't it.